

Looking at my Kindle and Smashwords formatting guides in 2024, I have found them to be too out of date now. While I still used the Kindle one as a basis every time I put out a book, things have changed too much. Now that KDP takes ePub, things have become easier, because you can build your book the way you want it and it will be ready in a single file for any platform.
Here, I will lay out the steps I take to format an ebook, but bear in mind I’m in no way an expert – this is simply how I do it. I take steps that are arguably unnecessary in order to reduce the possibility of things going wrong as much as possible (most notably, I still convert into html and remove the huge amounts of unnecessary code that Word puts in, so that when I take it to Cailbre, there’s no random Word code doing weird things to the formatting).
I recommend reading through this once before starting, and maybe even play with putting your book straight into Calibre, as that might work perfectly for you right away, removing a lot of work.
*I’ll put an asterisk beside the HTML-related parts you can probably get away with skipping if you want to.
A final note: I’m not covering images and tables because I don’t have those and I can’t be sure I’d get it right.
What You Will Need:
- Microsoft Word (it shouldn’t matter which version, and if you are using any other program, it should be the same principles – you may simply have to look harder for the menu options I mention)
- Notepad++ (free here)
- Dreamweaver (or another HTML editor)
- Calibre ebook editor (free here)
Or
- Windows Notepad (expensive web design software isn’t necessary)
What We’ll Be Doing:
We will start by tagging and then removing formatting.
We will then save as a web page, telling Word to keep out the clutter. Word will ignore us and leave in lots of clutter, so we will take the file to Dreamweaver or your equivalent and remove those unnecessary tags.
We will then import the cleanest possible version of the book into Calibre to finish off the ePub creation.
Simple. In theory.
LAYOUT
At this point, you should probably have the book laid out the way you want anyway, but it could be something like this:
- Title
- Copyright
- Table of Contents
- Author’s Note
- The main content
- About the author
- Anything extra
If you’re unsure what kind of copyright page to put in, it can be very simple, or it can go a bit further, like mine:
Copyright © 2024 Ross Harrison
Cover copyright © 2024 Ross Harrison
Cover design by Arianne Elliott
The right of Ross Harrison to be identified as the author of this work has been asserted in accordance with the Copyright, Designs and Patents act 1988.
All the characters in this book are fictitious, and any resemblance to actual persons, living or dead, is purely coincidental.
All rights reserved. No part of this publication may be reproduced, stored in a retrieval system, or transmitted in any form or by any means, electronic, mechanical, photocopying, recording, or otherwise, without the prior permission of the author.
PRESERVE FONT FORMATTING*
In order to make it a little easier when we get to the HTML editing part, we’ll remove all formatting from the document. This means that italic, bold, and underlined text will become normal text, so we need to mark it in order to later restore it. It should go without saying that you should save a new version of the book before starting this, just to be safe.
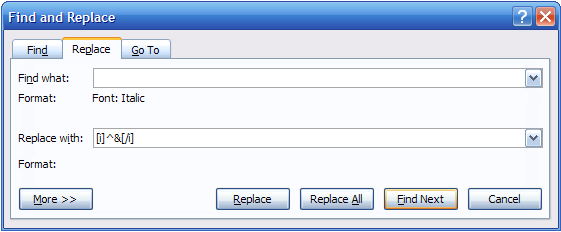
First, press Ctrl+H to bring up the Find and Replace window. I recommend going through one at a time rather than replacing all, and ensuring that the replacements come before and after exactly what they are supposed to, and don’t end up on their own lines, as this will make things easier later. Remember not to type the quotation marks in the following:
– Italics:
- Click inside the Find box, then press Ctrl+I and it will say ‘Font: Italic’ beneath the box
- Leaving this box empty, now click in the Replace box and type ‘[i]^&[/i]’
- Go through one by one, or click ‘Replace All’ (see above)
- Click in the Find box again and press Ctrl+I until the format line beneath the box disappears
– Underline:
- Click inside the Find box, then press Ctrl+U and it will say ‘Underline’ beneath the box
- Leaving this box empty, now click in the Replace box and type ‘[u]^&[/u]’
- Make necessary replacements
- Click in the Find box again and press Ctrl+U until the format line beneath the box disappears
– Bold:
- Click inside the Find box, then press Ctrl+B and it will say ‘Font: Bold’ beneath the box
- Leaving this box empty, now click in the Replace box and type ‘[b]^&[/b]’
- Make necessary replacements
- Click in the Find box again and press Ctrl+B until the format line beneath the box disappears
- NOTE: If your only bold text is chapter headings (and probably the title), it will speed things up a tiny bit to replace ‘b’ with ‘h2’ at this stage.
– Misc:
You may have other stuff you want to tag in the same way in order to find later, and it is simple a case of replacing the b or i or u with something else you will be able to easily search for. For example, line breaks are marked in mine simply with [para], because I know that I haven’t written that anywhere in the book (not with the square brackets) and so it will be very easy to do a search and ‘replace all’.
Note: Don’t try to be clever and use the correct HTML tags, because Word will assume later on that you want it to literally look like that, and replace the code with code to look like the code… Understand?
NUKE IT*
Since we’re already going the HTML route, this will cut down on the clutter when we get to the HTML editing.
- Open Notepad++ and create a new file if necessary
- In Word, press Ctrl+A to highlight everything, then Ctrl+C to copy it
- In Notepad++, press Ctrl+V to paste in your manuscript
It will look confusing and messy, but that’s fine. Don’t try to change anything. Let’s make it slightly less messy:
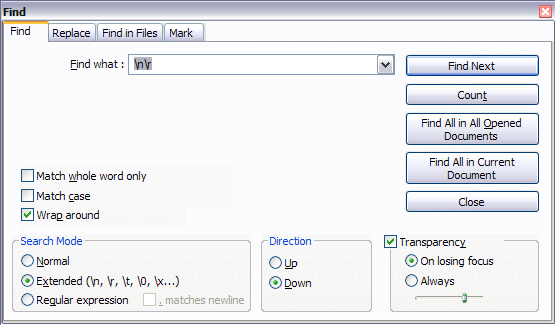
- Press Ctrl+F and click on the Replace tab. Select ‘Extended’ in the ‘Search Mode’ section at the bottom
- In the Find box, type ‘\t’ (without the quotes). Leave the Replace box empty, making sure there is no blank space by default, and click Replace All. This deletes tabs
- In the Find box, replace the ‘\t’ with ‘\n\r’. Still leaving the Replace box empty, click Replace All again. This will delete blank lines. NOTE: You may need to perform this step again after step 6
- In the Find box, replace the ‘\n\r’ with ‘ ‘ (two spaces), and in the Replace box, type ‘ ‘ (one space). Click Replace All. This deletes double spaces
- Close the Find and Replace window
- Click Edit -> Blank Operations -> Trim Leading and Trailing Spaces. This will delete space before and after paragraphs.
You work will still look confusing, but a little less messy. If there are any blank lines, perform step 3 again, because it’s annoying to deal with later.
FLYING VISIT TO WORD*
Create a new Word document.
In Notepad++, press Ctrl+A to select everything, and Ctrl+C to copy it. Now go to your new Word document and press Ctrl+V to paste your manuscript in.
DON’T TOUCH ANYTHING!
Save in whatever location you want, under the book’s title, but save as file type ‘web page, filtered’.
Close everything.
WEAVE YOUR DREAMS*
Now open your new web page in Dreamweaver, other editor, or simply Windows Notepad.
If you are familiar with HTML, you’ll probably be relieved at how little code there is. If you are not familiar, you may be worried at how much code there is. The good news is, most of it is the same little bit of code recurring over and over, so it’s easy to get rid of.
To begin with, you’ll find things a lot easier if you understand that almost all HTML tags have an opening and a closing tag. For example, the paragraph tag opens with <p> and closes with </p>. The closing tag always has that forward slash.
First thing to do is find the opening tag ‘<style>’. Highlight the whole style section (remember, that’s from <style> until </style>) and delete it.

That gets the main eyesore out of the way, and you’ll now be able to see the start of your actual content. Let’s start at the top. All that needs to be at the top is:
<html>

<head>

<title>(Your Book's Title)</title>

</head>
So delete anything else and correct the title if need be.
The next thing should be the ‘body’ tag. Delete everything in the tag except ‘body’, and the space before it, so that the tag reads simply <body>.
‘Divs’ have no place in our particular HTML file, so delete the whole line that starts with the div tag, and then jump right to the end of the book and delete the closing div tag too.
Next comes a simple but time-consuming process. We need to delete all of the unnecessary code. In the following bits of code, yours may read slightly differently to mine, so make sure to copy and paste from your own file and not this guide. At the moment, what we’re aiming for is to leave every paragraph with only the p tags on either side.
You’ll see MsoNormal code at the start of every paragraph, so it’s easy to get rid of a lot of that clutter:
- Highlight ‘
class=MsoNormal‘ (including the space, but NOT the right-hand bracket) and press Ctrl+C - Press Ctrl+F (or Ctrl+H in Notepad) to bring up the Find and Replace box
- In Dreamweaver, make sure the ‘Find In:’ box says ‘Current Document’ and the ‘Search:’ box says ‘Source Code’
- Click in the Find box and press Ctrl+V (it may already be there in Dreamweaver)
- Make sure the Replace box is empty (that includes any blank spaces) and click Replace All
Before:
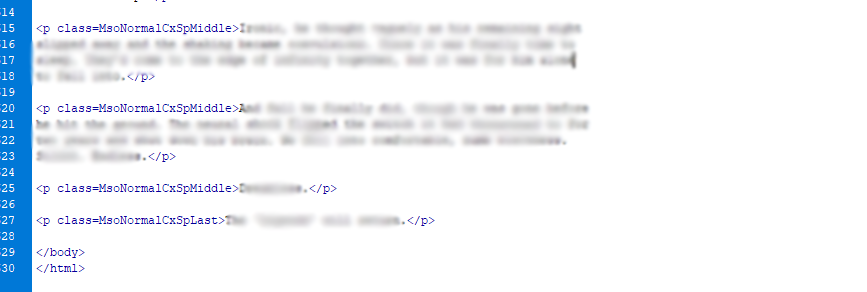
After:
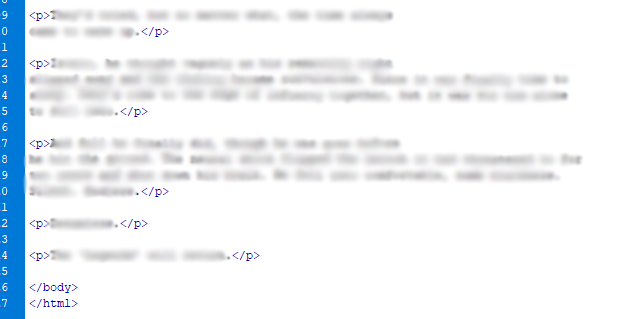
Scan through for anything else in your p tags that shouldn’t be there (again, at this point, there should be nothing in any of them but ‘p’), and do a replace all again to remove anything else you find (remember that there should be no space between the p and the angle brackets).
This should conclude the basic tidy up, because we took it into Notepad++ to get rid of as much formatting as possible. Just in case, though, you should run a search for the following tags and delete them if you find any. Remember to also delete the closing tag.
- <div
- <span
or (replace these with ‘<br />’ – I’ll mention this again later)- You may also have random instances of a p tag opening and immediately closing without anything in between, or perhaps a space between. These should go, too.
THE REPLACEABLES*
Don’t steal that title, it’s for my Expendables rip off with washed up TV stars. And I’ll sue you.
You’ll be wanting your italics, bolds, and underlines back now, I suppose. If you went through these in the Word document one by one to ensure they in exactly the right place, then you’ll be okay to use ‘Replace All’ this time around. If you did not, then you might want to replace one at a time to ensure they enclose only the word or words they should, otherwise you’ll find them in the wrong places.
- Press Ctrl+F (or Ctrl+H in Notepad)
- In the Find box, type ‘[i]’ (or whatever you used for italics in Word – again, without the quotation marks)
- In the Replace box, type ‘
<i>‘ - Click Replace All
- Now go back to the Find box and do the same with ‘[/i]’.

Now do the same process for the underlined and bold tags.
- Underline: [u] and [/u] should be <u> and </u>
- Bold: [b] and [/b] should be <b> and </b> (if you only have chapter headings and so used h2 instead, remember to replace with <h2> and </h2>).
FURTHER FORMATTING*
Paragraph indenting is simple to set up. We’re going to replace the style section that we deleted earlier. Go back to the top and, in between the title closing tag and the body opening tag, put in the following:

This might be too small an indent for you, but you’ll be able to preview the file later, so unless you already know what you want the indent to be, just leave it like this for now.
Note that we use em instead of px because it allows things to change proportionately when the reader changes their e-reader settings, which px (pixels) does not.
When uploading your ePub to Google, it will likely give you an error regarding this style tag, so if you intend to upload there, make it ‘style type=”text/css”‘.
The problem with this is that, in fiction, the first paragraph after a break shouldn’t be indented. What we just did says that the indent should occur every time the paragraph tag is used. To get around this, you can go to the first paragraph tag after every chapter or line break and change that first tag:
<p> becomes <p style="text-indent:0px;">
You can later get a bit more fancy with search and replace, so if you’re confident, you can leave this for now. Later, you can do something like search for every instance that starts with </h2> and ends with <p> and then replace all for that.
Here’s an example, with a bonus bit of code for any asterisks or the like that you might need centred:
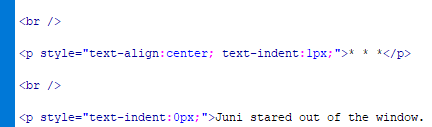
If you’ve read the previous Kindle guide, you’ll know this is where we inserted chapter breaks; however, we’ll be doing that in Calibre, so don’t worry that these are missing.
Next, you’ll want some blank lines. We will do this with <br />, but this is only a stepping stone – we’ll actually change them again once we get to Calibre, because the br tag isn’t supported everywhere. You may want one of these tags or two, or maybe even three. In front of my title and copyright information, I’ve used three each to push said bits of content down the page to be more centralised. This doesn’t work with every e-reader, which will sometimes ignore more than one blank line.
The <br /> tag forces a line break. The forward slash tells you that it’s one of the few that doesn’t need a closing tag. Because the p tag will always start a new line, you only need to combine it with one br to create a blank line (see above).
So, for example, the top of my book looks like this, and you can see how I used the br tag in the previous screenshot:

You can also see in this screenshot that I have h1 as the tag for my book’s title, but we’ll want something else for chapter headings. There are different ways of doing this. The most obvious is to use the header tags. That is, <h2> through to <h6>, which get progressively smaller. The <h1> is reserved for the title, so don’t use that elsewhere. I would go for <h3> personally, but you may prefer <h2>. Anything beyond 3, though, will probably be too small. Again, you’ll be previewing this later.
The header tags replace the paragraph tags and the bold tags:
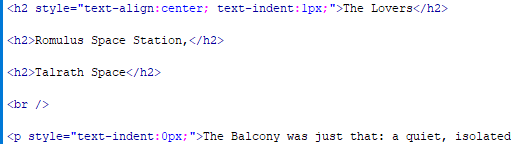
In this example, ‘The Lovers’ is the name of part one of this book. It will be on it’s own page (again, we’ll create page breaks later), but otherwise you can see from this code that it will be the same size as the chapter headings, but it will be centred, whereas the chapter headings will not. Obviously, if you want your chapter headings centred, you can copy that code from ‘style’ to the closing quotations (I actually don’t remember at this point why I have a text indent of 1px – you can probably do without that).
NOTE: The American spelling of ‘center’ is intentional. Don’t try to change any code to British English, because HTML simply isn’t written that way and it will stop working.
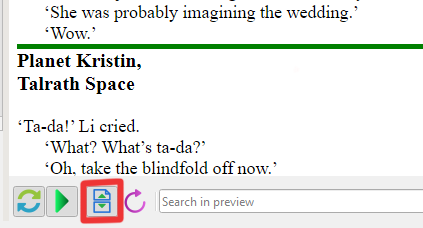
I have found that the fastest way to make this change, without having to deal with extraneous p tags, is to simply view the book from the Design view in Dreamwaver (if your editor doesn’t have the ability to show you the finished version instead of the code, you’ll just have to do the work to replace every p and b tag around your chapter headings manually). Scroll through the book on the Design side and find your headings. Highlight them, right click, and then change formatting to Heading 2 or whichever heading style you’ve chosen:

This will automatically remove the p tags as well as wrapping the headings in h2. You can then search and replace every instance of <h2><b> and </b></h2> and replace them with only the correct h tag nice and fast. Doing this will also allow you to encounter highlighted code, showing you that an opening or closing tag is in the wrong place – take this opportunity to click on it, which will move the code side of the view to the correct place, and move that tag to where it should be (for me, it’s most often an i tag on it’s own line instead of in front of the word that should be italicised).
I’ll say a quick bit about some other tags you might use; however, note that not all tags will be supported everywhere. Google, in particular, might give you a lot of errors when you try to upload, but it will also tell you on what line the error occurs and what code is unsupported, so you can easily fix it KDP is more forgiving.
<blockquote>could be used for a newspaper clipping, or a quote from a TV channel, or something like that. It has it’s own margins and indents, setting it apart from the normal text. You can’t use the<p>tags inside it, so use<br />to create new lines<hr />creates horizontal line all the way across the page, as seen breaking up the sections of this guide. If my content area didn’t have a fixed width, the lines would span the entirety of your screen. It requires no closing tag<strike>formats the contained text as strikethrough<sub>and<sup>create subscript and superscript
A Higher Calibre ePub
That should be pretty much it for the HTML side of things, if you’ve taken that route. After doing a scan to ensure it’s clean and tidy, without extraneous tags dotted around, save and close.
Now we go to Calibre. Now that KDP take ePub, this is the simplest way to create a single file you can upload anywhere. Its code will also be familiar to you if you went through the above HTML route.
Open the Calibre editor (not the viewer or the e-book management) and import your book. If you have an HTML or a docx file, this will be the same: File > Import an HTML or DOCX file as a new book.
In testing, loading in a Word document will work fine and it will look exactly like it does in Word, but the code will be extremely messy. This could result in many more errors when trying to upload to platforms like Google (which seems to be the most sensitive to code it doesn’t like).
Over on the left, in the File Browser window, you should see one file. Double click on that to open the book. What you will see, if you have done the HTML route, is what you just made. If you didn’t, you’ll see a confusing mess, and the first thing you should do is look for where it probably says ‘Unknown’ between two ‘title’ tags. Change that to the title of your book.
The next thing is to right click on the file you just opened, under File Browser again, and rename it so that you have no spaces. Mine while writing this guide is ‘Fear_of_the_Light.html’. This will avoid errors later.
Now we’ll make those page/chapter breaks. This is easy and you’ll be glad to hear it doesn’t involve the middle code view:
- Over on the right, in your book preview, scroll to where you want your first page break (probably after your title)
- Click the ‘Split this file…’ button at the bottom (shown in the screenshot)
- Mouse over where the break should be, as shown by a handy line, and click.
You have made your first new chapter! It will also split your original single file in two. The first contains only your first section (again, probably only your title), and the second contains everything else.
Now scroll through the entire book doing this everywhere there should be a page break – after your title, after your copyright, after your author’s note, after the end of every chapter, etc. You’ll end up with a large number of individual files.
Once this is done, we’re most of the way! Next, we will revisit those br tags. As I mentioned, they aren’t supported everywhere, so we need different code (this can almost certainly be done in previous steps and avoid br from the start, but Calibre does something odd with the code we’re about to use and deletes it entirely, seemingly at random. So we’re leaving it until almost last).
Use the search at the bottom of the middle window to find every instance of <br /> and replace it with ‘<p> </p>’ (minus the quotations):

You can see above that Calibre has already deleted that code in mine and replaced it with an empty paragraph tag. This may be completely fine, but I made sure to do a replace all for this right at the end.
Another thing we can do in Calibre is add our cover image. This is another thing that will differ between platforms – some will automatically add the cover when they are processing your book, while others won’t. So it’s best to do a bit of research first to determine whether you’re going to end up with two covers.
- Click Tools > Add Cover
- Find your cover image
- That’s it.
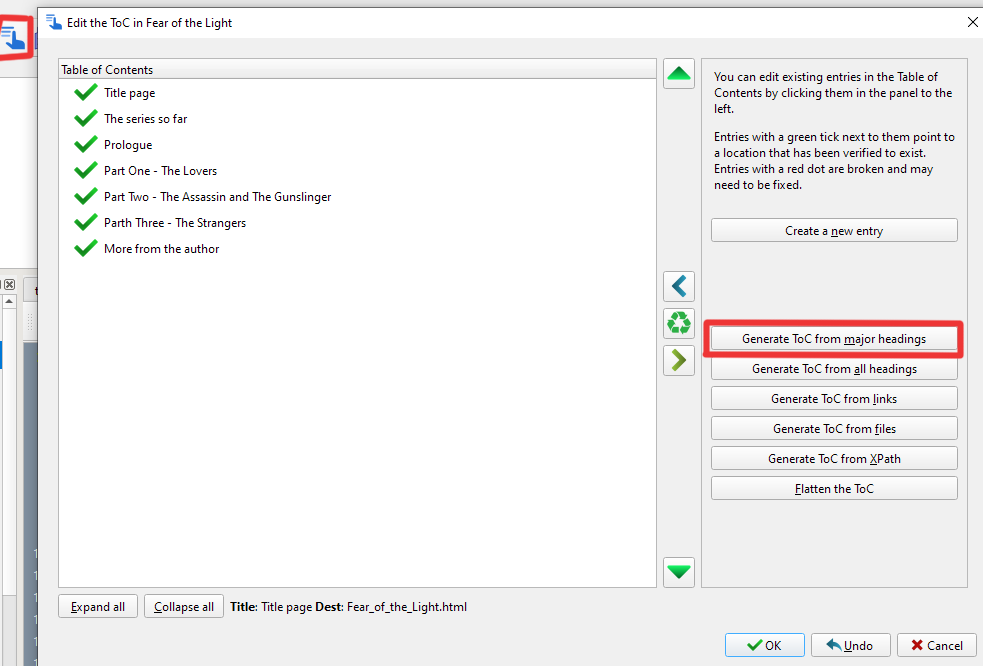
Lastly, we’ll add the table of contents. This is very easy as well:
- Click on the table of contents icon (top left of the screenshot)
- You can use the options on the right to automatically create your TOC using the heading tags we added in HTML, create a new entry using every file we just created, or your can manually enter them
- I don’t have conventional chapters, so I used my three parts/acts instead, but you can put them wherever you want.
And that’s it. The only thing left is to check the book. Click the little bug icon in the top tool bar or ‘Run Check’ in the top right window. Ideally, it will say ‘No problems found’, but more likely, there will be some small things to change. There will be an option to try automatically fixing them, which will work in many cases. In testing, I was surprised to find that there were actually no errors from the docx file. I’ll still be going the HTML route though, just because I hate how messy the code is otherwise.
PUBLISHING
That should be it! You can now import the finished ePub into your own reader to test, view it in Calibre’s own reader, and then upload it to KDP, Draft2Digital, Google, and wherever else.
This is the point at which you may find Google will give you errors. Other platforms will process the book and make any changes they need automatically (another reason I like to go the HTML route, so there will should ideally be nothing that needs to be automatically ‘fixed’), but Google will simply tell you what it doesn’t like and where in the book it is. These should be easy to fix, but let me know if you find anything that isn’t, and I’ll update the guide as necessary.


Leave a comment