


EDIT: Looking at this in 2024, much of the information here can still be used (I still use it as a guide every time I publish something), but it’s not as up to date as it could be. As I don’t have my finger on the KDP pulse, I won’t be trying to update this, because I’ll only leave things out and get things wrong. So, in short, you can use this as a basis for getting a clean file ready for KDP, but you’ll want to look around other, up to date guides too.
I recently wrote a guide on writing a book, and in it I said that I would write a guide to formatting for KDP (Kindle Direct Publishing). This will be vaguely similar to my Smashwords formatting guide, but simpler.
I’ve heard of plenty of people using the simple, automated process that KDP seems to expect by default, but to be absolutely sure that no issues will arise by the conversion process, I convert my Word file into an HTML file first. Doing so means that, so long as I make sure only HTML tags that the Kindle recognises make it through, what comes out the other end of KDP will be exactly what I want. The only errors possible in this way are any made by me.
Most people think that because this is done through HTML, it is therefore over their heads and far too hard and technical. In reality, HTML is a lot easier to grasp than you probably think. More to the point, you don’t really need to know HTML; you simply need to know what HTML tags should and should not be present in your file.
What You Will Need:
- Microsoft Word (it shouldn’t matter which version, and if you are using any other program, it should be the same principles – you may simply have to look harder for the menu options I mention)
- Notepad++ (free here)
- Dreamweaver (or another HTML editor)
Or
- Windows Notepad (expensive web design software isn’t really necessary)
What We’ll Be Doing:
As with the start of the Smashwords formatting guide, we will start by tagging and then removing any and all formatting. Or at least, so far as Word will allow.
We will then save as a web page, telling Word to keep out the clutter. Word will ignore us and leave in lots of pointless crap we don’t want or need, so we will take the file to Dreamweaver or your equivalent and remove those unnecessary tags.
That’s it.
To see the HTML tags supported by the Kindle, click here. If that looks daunting, we’ll be using very few of them anyway. This is a list of the most commonly used tags. Much smaller.
LAYOUT
At this point, you should probably have the book laid out the way you want anyway, but if you haven’t then this is a decent order:
- Title
- Copyright
- Table of Contents
- Author’s Note
- The main content
- About the author
- Anything extra
Of course, there’s a good chance you won’t want an author’s note, and a table of contents isn’t necessary.
If you’re unsure what kind of copyright page to put in, it can be very simple, or it can go a bit further, like mine:
Copyright © 2012 Ross Harrison
Cover copyright © 2012 Ross Harrison
Cover design by Cui Yuan
The right of Ross Harrison to be identified as the author of this work has been asserted in accordance with the Copyright, Designs and Patents act 1988.
All the characters in this book are fictitious, and any resemblance to actual persons, living or dead, is purely coincidental.
All rights reserved. No part of this publication may be reproduced, stored in a retrieval system, or transmitted in any form or by any means, electronic, mechanical, photocopying, recording, or otherwise, without the prior permission of the author.
NOTE: If you are doing this after formatting for the Smashwords edition, make sure that the line ‘Smashwords Edition’ isn’t still in your copyright information.
EM EN EMs
You will want to make sure your em dashes and en dashes are done right. While we’re at it, we might as well make sure your ellipses and quotation marks are right. The latter two won’t look any different on Kindle (actually, the quotation marks may look different on the more modern Kindles), but the dashes will.
If you’ve had the following options selected while writing, and Word has automatically changed your dashes and whatnot, then you can skip this bit.
- Click on the big yellow button in the top left of Word, then Word Options at the bottom of the drop down list (in earlier versions of Word, click Tools and then AutoCorrect Options, then ignore step 2)
- Click Proofing and then AutoCorrect Options
- In both the tabs AutoFormat and AutoFormat as You Type, make sure the options ‘Straight Quotes with Smart Quotes’ and ‘Hyphens with Dash’ are checked

Click OK until you’re back on the manuscript. Now we’ll use Find and Replace:
- Press Ctrl+H to bring up the Find and Replace window
- Find: “ and Replace: “ (Double quotes will automatically change to the nicer, curved ones)
- Find: ‘ and Replace: ‘
- Find: – and Replace ^+ (This creates an em dash)
- Find: – and Replace ^= (This creates an en dash)
- Find: … and Replace: … (In Find, type three full stops (periods). In Replace, press either Ctrl+Alt+. or Alt Gr+. for a proper ellipsis)
PRESERVE FONT FORMATTING
In order to make it a little easier when we get to the HTML editing part, we’ll remove all formatting from the document. This means that italic, bold, and underlined text will become normal text.
The problem with this method is that if you had text in italic, bold or underlined, and then deleted it, there may be white space with one of those still applied to it. This won’t matter (except in the case of underline) in the finished product, but I like to keep things as clean and tidy as possible, and so I don’t want that. Because we’re using Find and Replace, you can get around this problem by replacing one instance at a time, ensuring that you skip over anything that isn’t meant to be kept italicised, bold, or underlined. It could get tedious, but you probably shouldn’t have very much of this in the book anyway and I highly recommend doing it this way to ensure no issues.
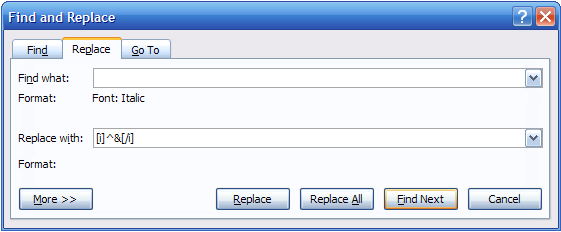
First, press Ctrl+H to bring up the Find and Replace window. Remember not to type the quotation marks in the following:
– Italics:
- Click inside the Find box, then press Ctrl+I and it will say ‘Font: Italic’ beneath the box
- Leaving this box empty, now click in the Replace box and type ‘[i]^&[/i]’
- Go through one by one, or click ‘Replace All’ (see above)
- Click in the Find box again and press Ctrl+I until the format line beneath the box disappears
– Underline:
- Click inside the Find box, then press Ctrl+U and it will say ‘Underline’ beneath the box
- Leaving this box empty, now click in the Replace box and type ‘[u]^&[/u]’
- Make necessary replacements
- Click in the Find box again and press Ctrl+U until the format line beneath the box disappears
– Bold:
- Click inside the Find box, then press Ctrl+B and it will say ‘Font: Bold’ beneath the box
- Leaving this box empty, now click in the Replace box and type ‘[b]^&[/b]’
- Make necessary replacements
- Click in the Find box again and press Ctrl+B until the format line beneath the box disappears
If for some reason you want to enclose your formatted text between something other than ‘[i]’, etc, you can; the ‘^&’ is the important part. That said, don’t try to be clever and use the HTML tags of ‘<i></i>’, etc, because Word will assume later on that you want it to literally look like that, and replace those brackets with code to display the brackets, rather than making them said tags… Understand? In other words, the result will be ‘<i>Text</i>’.
Do the same for anything else that will need attention, such as chapter headings (except not i, u, or b).
NUKE IT
Strictly speaking, this step isn’t entirely necessary, but it will cut down on the clutter when we get to the HTML editing.
- Open Notepad++ and create a new file if necessary
- In Word, press Ctrl+A to highlight everything, then Ctrl+C to copy it
- In Notepad++, press Ctrl+V to paste in your manuscript
It will look confusing and messy, but that’s fine. Don’t try to change anything. Let’s make it slightly less messy:
- Press Ctrl+F and click on the Replace tab. Select ‘Extended’ in the ‘Search Mode’ section at the bottom
- In the Find box, type ‘\t’ (without the quotes). Leave the Replace box empty, making sure there is no blank space by default, and click Replace All. This deletes tabs
- In the Find box, replace the ‘\t’ with ‘\n\r’. Still leaving the Replace box empty, click Replace All again. This will delete blank lines. NOTE: You may need to perform this step again after step 6
- In the Find box, replace the ‘\n\r’ with ‘ ‘ (two spaces), and in the Replace box, type ‘ ‘ (one space). Click Replace All. This deletes double spaces
- Close the Find and Replace window
- Click Edit -> Blank Operations -> Trim Leading and Trailing Spaces. This will delete space before and after paragraphs
You work will still look confusing, but a little less messy. If there are any blank lines, perform step 3 again.
FLYING VISIT TO WORD
After saving your Word document, as a new version of course, close it. Now create a new Word document.
In Notepadd++, press Ctrl+A to select everything, and Ctrl+C to copy it. Now go to your new Word document and press Ctrl+V to paste your manuscript in.
DON’T TOUCH ANYTHING!
Now click the big yellow button in the top left (or File) and then Save As. Save in whatever location you want, under the book’s title, but save as file type ‘web page, filtered’ and add an ‘L’ (but lower case) to the end of the file extension. In other words, it should read ‘Your Title.html’.
Close everything.
WEAVE YOUR DREAMS
Now open your new web page in Dreamweaver (dragging it over the Dreamweaver desktop icon is the simplest way), other editor, or simply Windows Notepad.
If you are familiar with HTML, you’ll probably be relieved at how little code there is. If you are not familiar, you may be worried at how much code there is. The good news is, most of it is the same little bit of code recurring over and over, so it’s easy to get rid of.
To begin with, you’ll find things a lot easier if you understand that almost all HTML tags have an opening and a closing tag. For example, the paragraph tag opens with <p> and closes with </p>. The closing tag always has that forward slash.
First thing to do is find the opening tag ‘<style>’. In Dreamweaver, and possibly other editors (which I will now stop referring to because it’s getting annoying), the tag is in pink font, but obviously in Notepad it won’t be. Highlight the whole style section (remember, that’s from <style> until </style>) and delete it.

That gets the main eyesore out of the way, and you’ll now be able to see the start of your actual content. Let’s start at the top. All that needs to be at the top is:
<html>

<head>

<title>(Your Book's Title)</title>

</head>
So delete anything else and correct the title if need be.
The next thing should be the ‘body’ tag, but it has unnecessary rubbish in it, along the lines of ‘lang=EN-US’. Delete that, and the space before it, so that the tag reads simply <body>.
After the body tag, the next thing you should see is the very first bit of text of your book, preceded by <p>. Delete anything between the body tag and this. In my case, the only remaining thing in between is
tags on either side.
For example, the first paragraph of my first chapter looks like this to begin with:
As his nose cracked under my knuckles, I reflected on how much I hated violence. Not violence stemming from my own unresolved anger issues. That I was fine with. It was violence against women that I hated. I didn’t know why, but the prettier the girl the more I hated it. Maybe I was shallow.
It should read simply:
As his nose cracked under my knuckles, I reflected […] Maybe I was shallow.
You’ll see that the MsoNormal rubbish is at the start of every paragraph, so it’s easy to get rid of a lot of that clutter:
- Highlight ‘
class=MsoNormal‘ (including the space, but NOT the right-hand bracket) and press Ctrl+C - Press Ctrl+F (or Ctrl+H in Notepad) to bring up the Find and Replace box
- In Dreamweaver, make sure the ‘Find In:’ box says ‘Current Document’ and the ‘Search:’ box says ‘Source Code’
- Click in the Find box and press Ctrl+V (it may already be there in Dreamweaver)
- Make sure the Replace box is empty (that includes any blank spaces) and click Replace All
This will take around 30 seconds, perhaps a minute, maybe a little longer in Notepad. Just make sure to save after everything you do, especially with Notepad, as it can be a little temperamental.
You can probably guess what is next.
- Highlight ‘
‘, this time include both brackets. Depending on where you’re from, this might say something slightly different, such as ‘EN-US’ - Open Find and Replace and repeat the above steps
- Now do the same with
Now it looks a lot less untidy. It’s mostly your text, with the odd blue (unless you’re in Notepad) HTML tag dotted about.
Go to the very end of the file. After the final
, it should look like this:
</body>
</html>
Delete that closing ‘div’ tag.
This should conclude the tidy up, because we took it into Notepad++ to get rid of as much formatting as possible. Just in case, though, you should run a search for the following tags and delete them if you find any. Remember to also delete the closing tag. After this, scan it all to see if anything catches your eye. Remember, except for the front matter – which we’ll get to in a minute – you should only see <p> in front of your paragraphs, and </p> at the end.
- <div
- ‘<p ‘ (that’s a space after the ‘p’. If you find any paragraph tags with more than just the ‘p’, correct it to simply <p> – there should never be a space)
- <span
(replace these with ‘<br />’ – I’ll mention this again later)
THE REPLACEABLES
Don’t steal that title, it’s for my Expendables rip off with washed up TV stars. And I’ll sue you.
You’ll be wanting your italics, bolds, and underlines back now, I suppose. If you went through these in the Word document one by one, as I suggested, then you’ll be okay to use ‘Replace All’ this time around. If you did not, then you should probably do so this time. You may find that you have empty paragraphs dedicated to a closing bold tag, or some such. For the sake of tidiness, more than practicality, you might want to fix this. I’ll assume that you did take my advice the first time round though:
- Press Ctrl+F (or Ctrl+H in Notepad)
- In the Find box, type ‘[i]’ (or whatever you used for italics in Word)
- In the Replace box, type ‘
<i>‘ - Click Replace All
- Now go back to the Find box and type ‘[/i]’
- In the Replace box, type ‘
</i>‘ - Click Replace All

Now do the same process for the underlined and bold tags. Note, though, that there’s no point in putting the title or chapter headings in bold, because we’ll be doing that another way in a minute.
- Underline: [u] and [/u] should be <u> and </u>
- Bold: [b] and [/b] should be <b> and </b>
FURTHER FORMATTING
These are the basic tags, and others will rarely be necessary. If you need something that I haven’t covered, refer to the list of tags that Kindle accepts (link)(but not until the end of this guide). If you do, just remember to use the closing tags too (or you could leave a comment asking me).
UPDATE: Since originally writing this, it has become clear that using pixels as a unit of size for font, indents, etc., is not the best way. Kindle users can, of course, make the font whatever size they want, so messing with it isn’t a great idea. Because it is what I have used until now, I will leave it in the below examples, but consider these two points: 1) The basic font size doesn’t need to be set (the very next bit of code I tell you to put between the style tags), and 2) Where it is important to put sizes (such as the text indents), you can use ’em’ rather than ‘px’. Em will change the size relative to what the reader has selected – so a font size of 1.5em is basically 1.5x the font size they have selected. This is handy for things like chapter headings, if you don’t use h2, h3, etc. (coming up).
Paragraph indenting is simple to set up. Go back to the top and, in between the title closing tag and the body opening tag, put in the following:
<style>

p {font-size:12pt; text-indent:20px;}

</style>
This might be too small an indent for you, but you’ll be able to preview the file later, so unless you already know what you want the indent to be, just leave it like this for now.
The problem with this is that, in fiction, the first paragraph after a break shouldn’t be indented. What we just did says that the indent should occur every time the paragraph tag is used. To get around this, you can go to the first paragraph tag after every break and change that first tag:
<p> becomes <p style="text-indent:0px;">
If, on the other hand, you don’t mind having no indent for paragraphs (perhaps your work is non-fiction), then don’t insert the style bit at the top. Instead, if you find a paragraph that needs indenting, use the above code in the paragraph tag, but put ’20px’, or however much you want it indented.
Now, let’s insert page breaks (i.e. forcing a new page, such as at the end of a chapter). You’ll presumably want these between chapters, and after your title page, copyright page, table of contents page, etc. If you’re familiar with HTML, don’t get a carried away. This simple line of code is exclusive to the Kindle, so you probably don’t know it:
<mbp:pagebreak />
That space before the forward slash is intentional, of course. Always make sure to write your bits of code exactly as written here.
Next, you’ll want some blank lines. If we hadn’t taken the file into Notepad++, it would be riddled with iterations of . Instead of these, we want <br />. That’s a space between the ‘r’ and the forward slash, if it isn’t clear. You may want one of these, or two. In front of my title and copyright information, I’ve used three each to push said bits of content down the page to be more centralised. This doesn’t work with the older E-Ink Kindles, but seems to with the Kindle Fire tablets and Kindle for other devices, and I think it looks better like that. It’s entirely up to you.
The <br /> tag forces a line break. The forward slash tells you that it’s one of the few that doesn’t need a closing tag.
So, for example, the top of my first chapter looks like this:
<p>ONE | QUITTING TIME</p>

<br />

<p style="text-indent:0px;">As his nose cracked under my knuckles [...]
Well, actually, it doesn’t, because I have different tags on the chapter heading, but I didn’t want you to get hung up on that before we get to it.
Speaking of which, we might as well do that next. There are different ways of doing this. The most obvious is to use the header tags. That is, <h2> through to <h6>, getting progressively smaller. The <h1> is reserved for the title, so don’t use that. I would go for <h3> personally, but you may prefer <h2>. Anything beyond 3, though, will probably be too small. Again, you’ll be previewing this later, but if it helps at all, the section headings in this guide are <h2>, while the ‘What You Will Need’ and ‘What We’ll Be Doing’, back at the start, are both <h3>. There’s more of a difference on the Kindle though.
The header tags replace the paragraph tags, so the chapter I just showed you would read:
<h3>ONE | QUITTING TIME</h3>
You’ll probably want it centred, so that changes it to:
<h3 style="text-align:center;">ONE | QUITTING TIME</h3>
NOTE: The American spelling of ‘center’ is intentional. Don’t try to change any code to British English, because HTML simply isn’t written that way and it will stop working.
The way I have actually done my chapter headings is like this:
<p style="text-align:center;"><b>ONE | QUITTING TIME</b></p>
Why I did that…I have absolutely no idea. But I’ve done that with everything I’ve published on the Kindle. I have a vague recollection of something to do with a table of contents being automatically generated based on the header tags, but I don’t think that’s a thing. I couldn’t find anything about it when I Googled it. I can’t for the life of me think why I would have done that, but never mind. If you find any issues using the header tags, you can always come back and try it this way instead.
If you have any asterisks or other kinds of symbol for breaks, you’ll probably want them centred. This is as simple as centring anything else we’ve done so far. You’ll also want a space above and below the symbols, so it will look like this:
[...] end of section.</p>

<br />

<p style="text-align:center">* * *</p>

<br />

<p>Start of next section...
I’ll say a quick bit about some other tags you might use:
<blockquote>could be used for a newspaper clipping, or a quote from a TV channel, or something like that. It has it’s own margins and indents, setting it apart from the normal text. You can’t use the<p>tags inside it, so use<br />to create new lines<hr />creates horizontal line all the way across the page, as seen breaking up the sections of this guide. If my content area didn’t have a fixed width, the lines would span the entirety of your screen. It requires no closing tag<strike>formats the contained text as strikethrough<sub>and<sup>create subscript and superscript
THE FRONT MATTERS
Now we need to format the front matter (i.e. the title page, copyright page, etc.). As I mentioned earlier, the title should be between the <h1> tags. You’ll also want it centred.
<h1 style="text-align:center;">ACTS OF VIOLENCE</h1>
Below this will be your name, also centred:
<p class="author" style="text-align:center; text-indent:0px;"><b>ROSS HARRISON</b></p>
You may have a series title to go above your title; do this the same way we just did the author name, but remove the ‘class=”author”‘ attribute.
Next is the copyright page. This is how I have done mine:
<blockquote style="text-align:center; font-size:10pt;">Copyright © 2014 Ross Harrison

<br />

Cover by Mark Williams, copyright © 2014 Ross Harrison

<br />

The right of Ross Harrison to be identified as the author of this work has been asserted in accordance with the Copyright, Designs and Patents act 1988.

<br />

All the characters in this book are fictitious, and any resemblance to actual persons, living or dead, is purely coincidental.

<br />

All rights reserved. No part of this publication may be reproduced, stored in a retrieval system, or transmitted in any form or by any means, electronic, mechanical, photocopying, recording, or otherwise, without the prior permission of the author.</blockquote>
The <br /> tags could easily come at the end of the sentences, but I broke it up to make it clearer for this guide. I made the text a little smaller too, for aesthetics’ sake.
If you have an author’s note, or anything else, it will most likely be done just like a normal chapter, except you may want it centred. By now, you’ll be able to work out how to do that.
TABLE OF CONTENTS
We’re nearly there now. The table of contents is pretty simple. First, create a page (using <mbp:pagebreak />) and simply copy and paste in your list of chapters. You should include the title page and anything that comes after the main content. Enclose each line in <p> tags.
Next, we need to create anchors and links to those anchors. Go to your first chapter heading and change the line to the following:
<h3 style="text-align:center;"><a name="Chapter 1"></a>ONE | QUITTING TIME</h3>
What you put after ‘name’ is up to you; it could be the actual name of the chapter. This is an anchor, which we can now link to from the table of contents. Do the same for the rest of your chapter headings, title, and any other place you want the TOC to link to. In other words, put <a name="Name"></a> right before text, always inside the paragraph or header tags. Make sure not to use the same name twice.
Next, go back to the table of contents. We’ll now point each one to the right place. So, using the first chapter again, it will look like this:
<p><a href="#Chapter 1">One | Quitting Time</a></p>
The hash tag/pound sign goes in front of whatever you have named the anchor, without a space.

Now save, go to where you have the file saved and double click it. If it doesn’t open in your browser, then something is probably wrong. It won’t look right in the browser, of course (not least of all because it won’t recognise the page break code), but you can test each TOC link to make sure they go to the right place.
AFTER CARE AND PREVIEWING
That should be pretty much it for the HTML side of thing. You are able to add images into the work, but that would make the guide even longer, and most people don’t have images. It also raises the delivery cost that Amazon charges. If, however, enough people are in need of help with images, I’ll add it to the guide.
Hopefully I’ve covered enough in this guide that if you need to do anything else, you can piece it together from what’s here. Otherwise, you can ask in the comments. If you require any special characters, simply copying them from Word and pasting them should do the trick; otherwise, here’s a list. Just make sure to preview to ensure it displays on the Kindle properly.
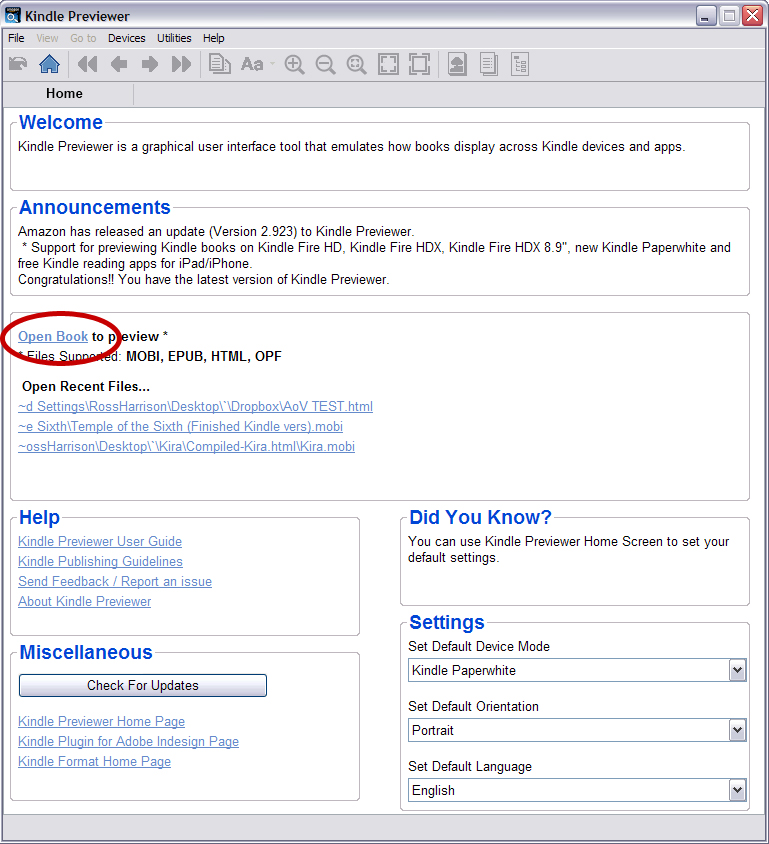
To preview your file, you can download the Kindle Previewer here. All you need to do then is click ‘Open Book’ and find your HTML file. The previewer will then convert the file into .mobi, which Kindle uses, and display it for you as it will on a Kindle. If you go to the top and click on the ‘Devices’ tab, you can switch between various kinds of Kindle to see the difference.
Now that you have the .mobi (it will have saved in a folder in the same location as your HTML file), you can put it onto your own Kindle if you want. The save location will be slightly different depending on what device you are using, but for me, I simply plug my Kindle into the computer, open its folder, open the ‘documents’ folder, and drag the .mobi in. Then you’ll be able to open it on your Kindle for a better idea of how it will look.
Once it is published on Amazon, you’ll be able to download it for free (assuming you sign in to KDP with your main Amazon account), and know for certain that it looks how you want it to. In the very unlikely event that it doesn’t, you can easily update the file even after publication.
PUBLISHING

This part is pretty simple. Go to Kindle Direct Publishing and sign in with your Amazon account, or create one. On your Author Dashboard, click Add New Title.
The next page will ask you for the book’s details and those of the author. You will also upload the cover and HTML file here. Before you come here, you’ll need to have thought about both Kindle Select and whether or not you want DRM (Digital Rights Management) on your book. I have said a little about the former in the last part of my How to Write a Book Guide, but you’ll need to read about the latter for yourself. I always say no to it.
The second page is where you will price your book and choose your royalty rate. This is either 35% or 70%; each has minimum and maximum pricing requirements. You will also be able to enrol in Matchbook, which means if you have a print copy of your book on Amazon as well, you can give the customer a special price for the ebook if they buy the physical copy.
And…that’s it. Hopefully you found this guide helpful, and hopefully I’ve covered everything most people will need. If you have any questions, let me know in the comments.

Leave a comment